
Audio-visual setup guide
If you are organising a community activity at the MCCHR Resource Centre, use this guide to set up loudspeakers, projector, microphones, and other audio-visual equipment provided in the space.
The equipment, cables, adapters, and all parts of the audio-visual setup can only be used at the MCCHR Resource Centre and should never be removed from the activity space. For assistance with the audio-visual setup, contact MCCHR.
You can control all lights in the activity space using smart switches.
1. Audio mixers

The activity space is equipped with two audio mixers. To use the audio mixers, turn ON the switch on the power socket. Turn it OFF after your activity.
Do not unplug any power adapters or USB cables from the socket.
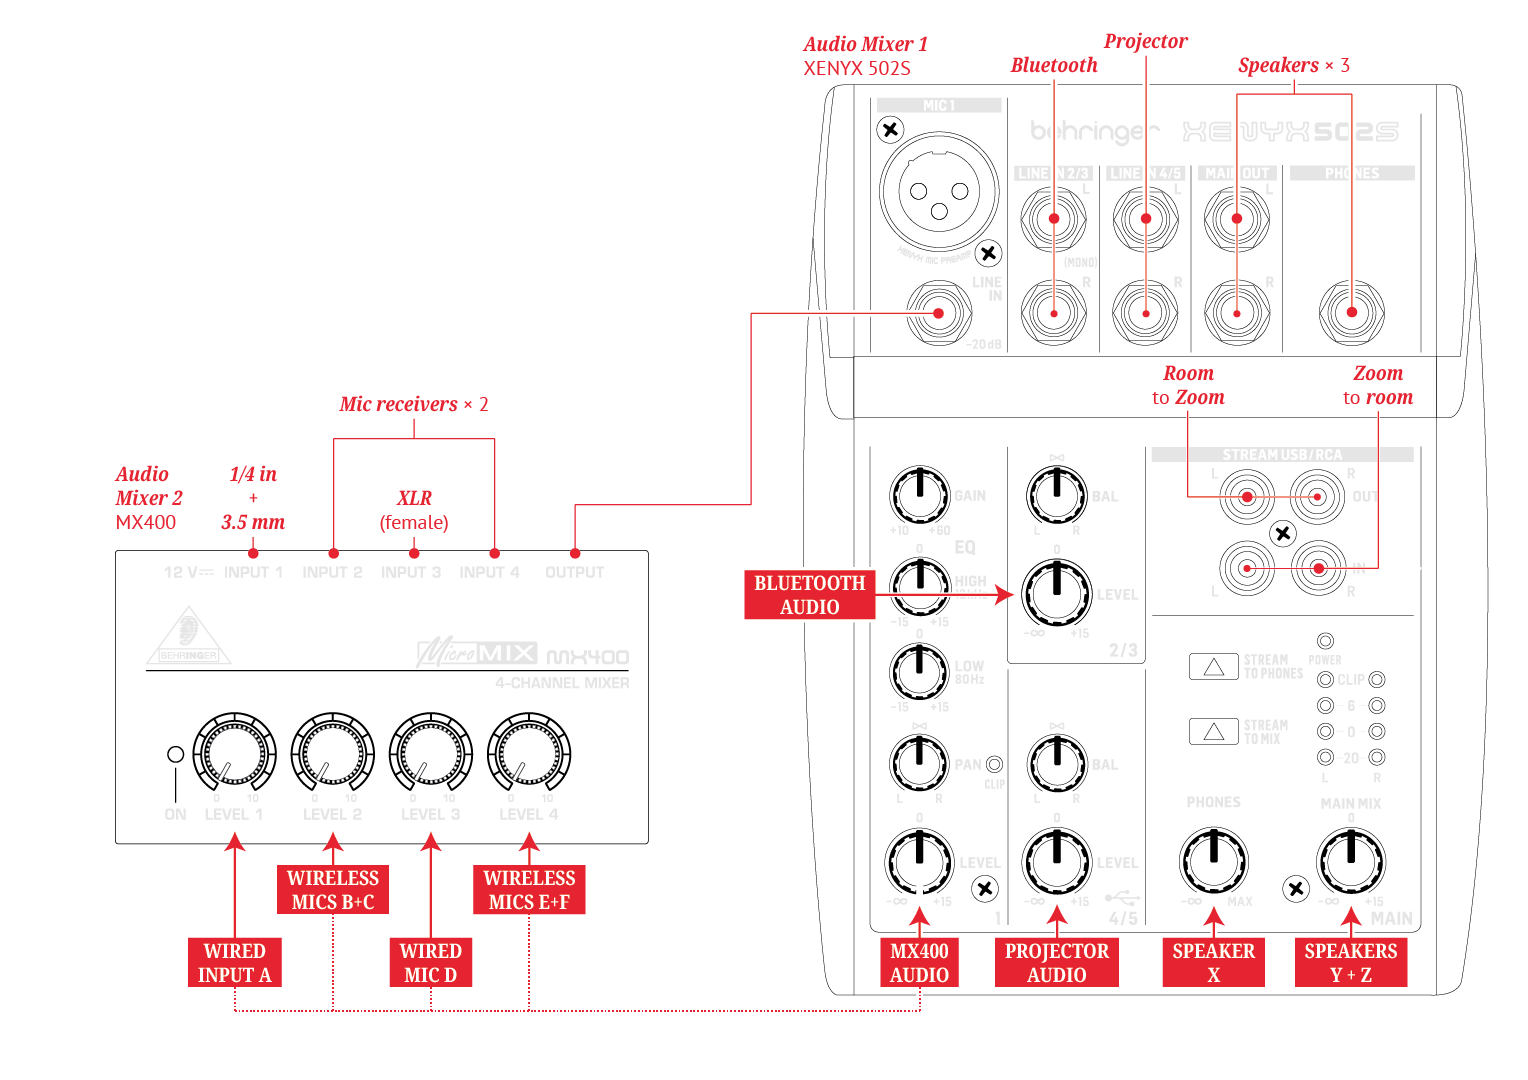
Audio mixer 1 (XENYX 502S) receives inputs from audio mixer 2, Bluetooth audio, and projector audio. Its outputs are sent to the three loudspeakers. There’s also an audio connection available via a USB-C adapter that enables two-way audio to and from a videoconferencing application (like Zoom) on your computer.
Audio mixer 2 (MX400) receives inputs from the microphones and sends its output to audio mixer 1. This audio mixer also has a 1/4 in audio port, with a 3.5 mm adapter, to receive input from an external audio source.
Do not disconnect any cables from the audio mixers.
2. Projector
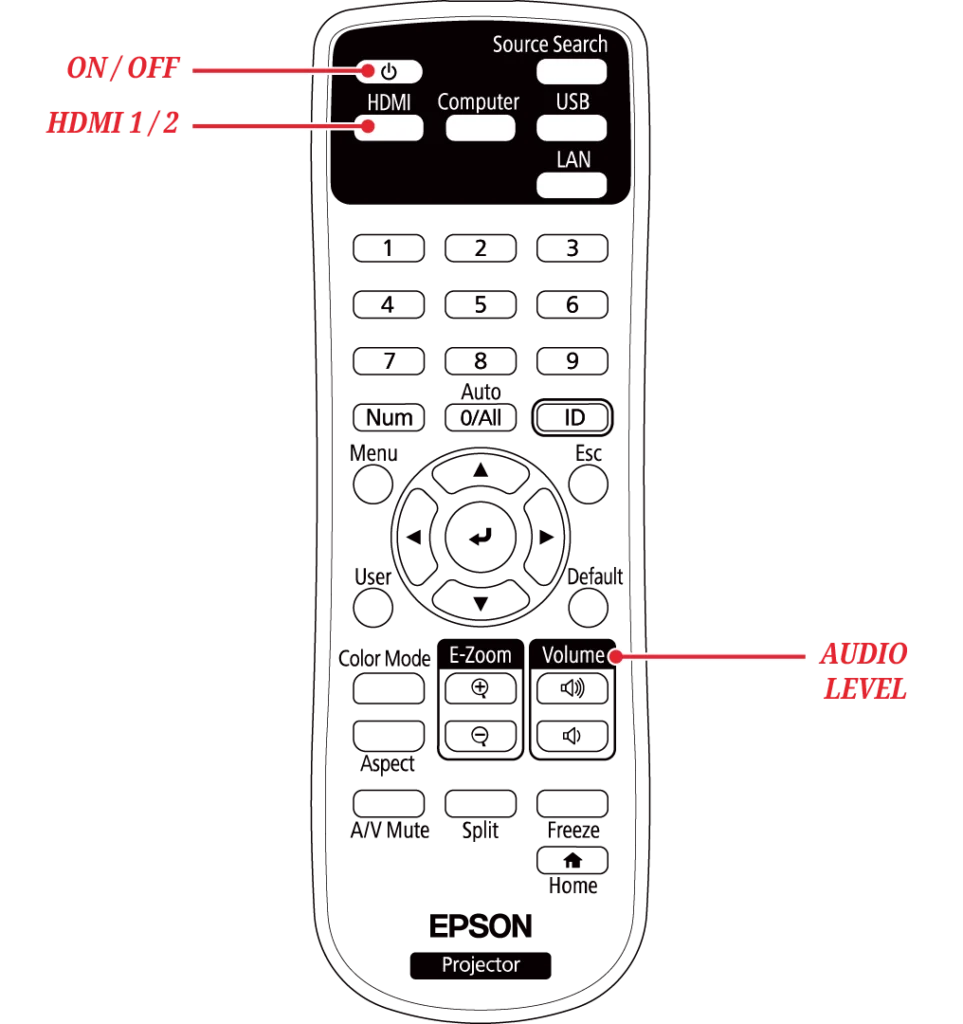
The activity space is equipped with a projector and projection screen. To use them, draw down the projection screen and turn ON the projector using the EPSON projector remote control.
To turn the projector video and audio ON or OFF temporarily, use the A/V mute button on the EPSON projector remote control.
To control the projector’s audio level, adjust channel 4/5 (Projector Audio) on audio mixer 1. You may also need to adjust the audio level using the volume buttons on the EPSON projector remote control.
The projector’s HDMI 1 input is wireless whilst the HDMI 2 input uses a cable. You can switch between these HDMI inputs using the EPSON projector remote control.
2.1. HDMI 1 (wireless)
To connect to projector wirelessly, your computer must be connected to the WiFi SSID pusatrakyatlb. You can find the WiFi key at the resource centre.
Google Chrome (Chromecast)
- On your computer’s Google Chrome browser, click More on the top right.
- Choose Cast, save, and share and Cast…. Then, select MCCHR-projector.
macOS (AirPlay)
- On your macOS computer, click in menu bar on the top right.
- Click , then select MCCHR-projector.
Windows (Miracast)
- On your Windows computer, press + K on your keyboard.
- Select MCCHR-projector.
2.2. HDMI 2 (cable)
If your computer does support wireless connection, you can use the HDMI cable provided. If necessary, use the HDMI to USB-C adapter.
Do not change the orientation of the projector. Do not disconnect any cables from the projector.
3. Loudspeakers
There are three loudspeakers available in the activity space:
- Under the audio mixers (Speaker X);
- Near the projection screen (Speaker Y); and
- In the pantry/breakout area (Speaker Z).
To control the audio levels, adjust Phones (Speaker X) and Main Mix (Speakers Y+Z) on audio mixer 1.
You might notice a hissing or humming noise on the speakers when you push these levels past 0. To avoid this, maintain them at 0 or lower. Then, adjust the levels for individual input channels that you use on the audio mixers.

You can also adjust the audio level on each speaker.
Do not disconnect or move the speakers.
4. Microphones
There are five microphones available in the activity space:
- Wireless mics B+C;
- Wired mic D; and
- Wireless mics E+F.
4.1. Wireless mics
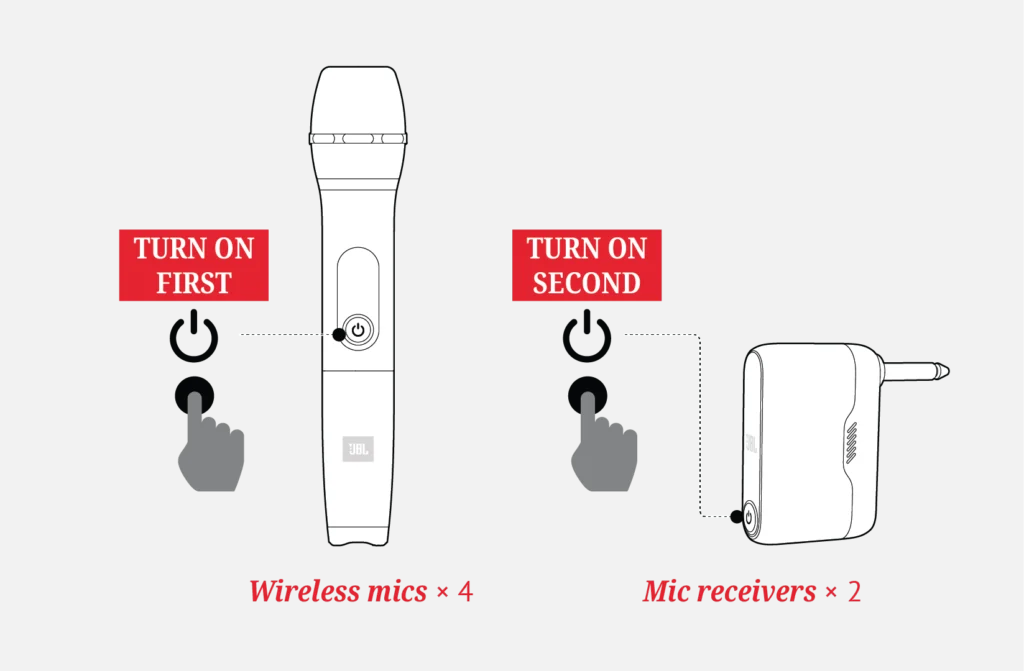
Each JBL mic receiver is linked to a pair of JBL wireless mics. To use the wireless mics:
- Change the rechargeable batteries in the wireless mics with the fully-charged ones available in the battery charger.
- Turn ON the wireless mics first. Then, turn ON their mic receiver.
- Adjust channels 2 or 4 (Wireless Mics B+C or E+F) on audio mixer 2 to control the audio levels.
Do not use any alkaline batteries with the wireless mics and the battery charger; only use the LADDA rechargeable batteries provided.
Turn OFF the wireless mics and mic receivers after your activity.
Do not disconnect the mic receivers from audio mixer 2. Do not disconnect the USB cables from the mic receivers.
4.2. Wired mic
The wired mic is available for use if you need an extra microphone. To control the wired mic’s audio level, adjust channel 2 (Wired Mic D) on audio mixer 2. You can use the XLR cable to extend the wired mic if necessary.
Do not disconnect the wired mic from audio mixer 2.
5. Other audio inputs and outputs
5.1. Videoconferencing (Zoom)
If you are organising a hybrid activity – with some participants joining in-person and some remotely via a videoconferencing application (like Zoom) – you can connect the USB-C audio adapter provided to your computer (Zoom to room and room to Zoom).
On your videoconferencing application, choose the USB-C audio adapter as your mic and and as your speaker for two-way audio. This will allow in-person participants to communicate with those joining remotely via the audio system and vice versa.
You can adjust the audio levels in your videoconferencing application settings.
5.2. Bluetooth audio connection
You may connect your computer, tablet, or phone to the audio system via Bluetooth. On the UGREEN Bluetooth receiver, press the button for 3 seconds to enable pairing mode. On your device, open the Bluetooth settings, and connect it to UGREEN-CM672.
To control the Bluetooth audio level, adjust channel 2/3 (Bluetooth Audio) on audio mixer 1.
5.3. Wired audio connection
You can also connect your media player or device to Input 1 on audio mixer 2. You need to use your own 1/4-inch cable. If you have a 3.5-mm cable, use the adapter provided.
To control the wired audio level, adjust channel 1 (Wired Input A) on audio mixer 2.
Do not disconnect any cables from the audio mixers.
6. Troubleshooting
Wireless mics are not paired to the mic receiver.
Turn OFF both the wireless mics and mic receiver. Turn ON the wireless mics first. Then, turn ON the mic receivers.
Microphones are too soft.
Increase the gain for channel 1 (MX400 Audio) on audio mixer 1. Then adjust the levels on audio mixer 2 as needed.
Hissing or humming noise heard on the speakers.
On audio mixer 1, keep the levels for Phones (Speaker X) and Main Mix (Speakers Y+Z) at 0. Lower the levels for audio inputs that are not in use. This is usually channel 2/3 (Wired Input G) on audio mixer 1 and channel 4 (Wired Input F) on audio mixer 2. If you don’t use any of the microphones, you should lower the levels for channels 2 (Wireless Mics B+C), 3 (Wired Mic D), or 4 (Wireless Mics E+F) on audio mixer 2.
Bulletin
Subscribe to our email newsletter to receive the latest news and updates from the MCCHR team directly in your inbox.
for Constitutionalism
and Human Rights